There is no need to make a slip knot to secure the yarn, just leave the tail hanging down the back of your work. Continue pulling up loops of the new color until the next color change or the end of the row. For the return half of the row, see below.
I use the afghan stitch for all kinds of projects. The Winnie the Pooh afghan and the NASCAR pillows are all examples of projects I've done with this great stitch. It all started with the Pooh afghan. I stumbled across the pattern purely by accident, and I knew I had to make it. Since the pattern was done in a graph format, I thought I had only two options: single crochet or afghan stitch.
I started the pattern in single crochet only to find that my gauge was terrible and I really hated the way the color changes worked. I tried to carry the unused colors across the back or crochet over them like I had done in other projects. Unfortunately, that left loops and bulges, which meant I would have to line it. I also hated the confusion of reading one line of the graph going in one direction and then reversing it for the next row. I must have frogged that afghan at least three times before I finally decided to give the afghan stitch a try.
I don't know how to cross-stitch, so I decided to learn how to change colors within the stitch. The really nice thing about this method is that you always read the graph from right to left, so it was very easy to keep track of my place. I also found that it worked up faster for me than the single crochet did, and it makes a much more solid picture than you get with cross-stitching.
I have assembled a wide variety of tips
and hints on using the afghan stitch. Topics you will find
in this tutorial include:
This tutorial was NOT meant to teach you how to crochet or how to do the basic tunisian (afghan) stitch.
For myself, I've made a simple rule regarding color changes and the number of stitches I will have to cross when carrying yarn:
More than two, add yarn new. Carry is best for two or less.
Also, I never carry yarn up and across a row I don't need it on.
I know this makes for more ends to weave, but I think it's better to weave an extra tail or two than have yarn criss-crossing itself across the back of a piece. The more times you carry yarn in afghan stitch, the more loops you leave that could be snagged or worse. And in afghan stitch, I have not found a way to "crochet over" the loose yarn as you can with other stitches. The "hidden" tails will be very secure if you follow my guidelines in the section Weaving Ends.
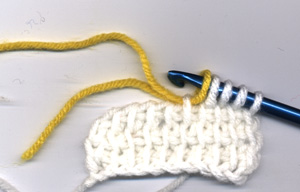
When translating colors in a graph to the actual crocheted piece, it helps to think of each stitch in your work as a block on the diagram. So if the 4th block on the graph indicates a color change, then you will change the color of the 4th stitch. Stitches are made in the vertical bars, so to change the color of the 4th stitch, you would change the color of the 4th vertical bar. Do not count the starting loop of each row (see Counting Stitches). To start a new color, simply drop the old color behind your work and pull up a loop in the next stitch.
There is no need to make a slip knot to secure the yarn, just
leave the tail hanging down the back of your work. Continue
pulling up loops of the new color until the next color change
or the end of the row. For the return half of the row, see
below.
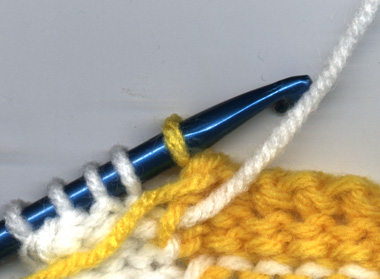
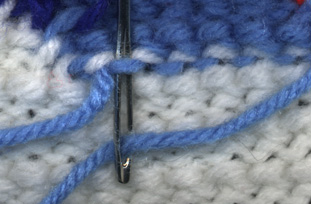
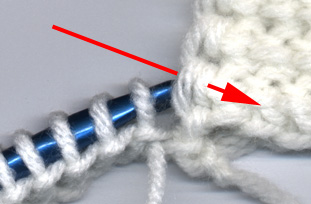
Picking up a previously used color is quite simple also. To keep the stitches from gapping apart at a color change, the old color must be secured. To do this, pull the old color across the back of the next stitch and pull the new color up over it.
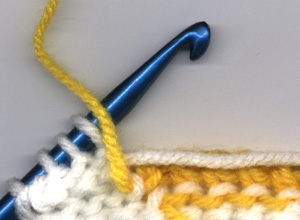
Then insert the hook in the next stitch and draw up a loop of the new color.
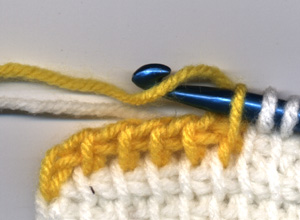
Once you have drawn up the first loop of the new color, you can
let the old color fall to the back of your work.
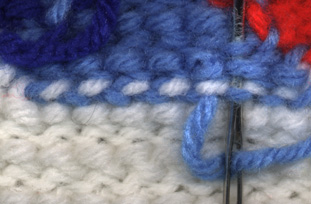
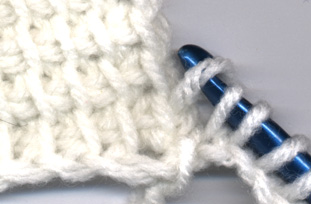
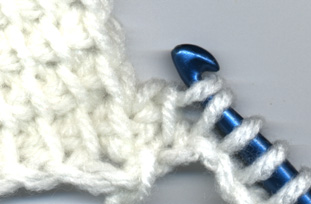
The return half of the row is equally simple. The second loop on the hook will always indicate the next color to be drawn through. As before, you will need to cross the two yarns to prevent gapping. Pull the old color to the left, across the back of the next stitch.
Pull up the new color over the old, locking the old color in place,
and draw the new color through two loops on the hook.
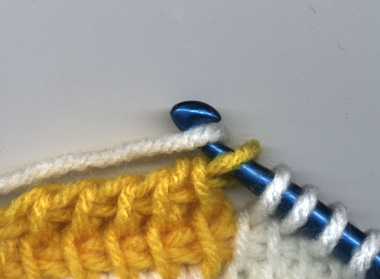
Once you have drawn the new color through, you can let the old color drop to the back of your work.
My simple method of weaving in all those little ends makes it possible to change colors in the afghan stitch without the use of knots. The ends are quite secure and the weaving is almost invisible.
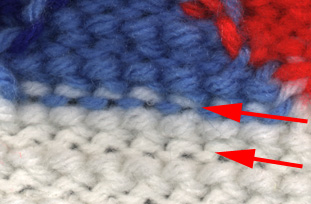
Make sure to leave a 6 to 8 inch tail whenever you start or end new yarn. I generally use a metal or plastic yarn needle. On the back of your work, you can easily see where one row loops around another. I've used an area where two colors meet so you can easily see how the two rows loop around each other. These are the loops in which you will weave.
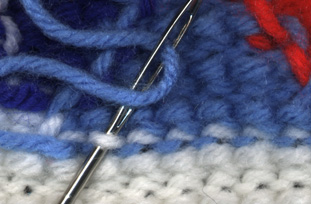
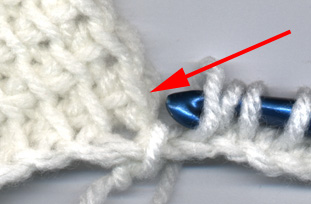
Thread the needle and insert it into a nearby loop. Be careful
to choose a loop that is at least one stitch away from the loose
end so that you do not unravel your work. I try to go "down"
through the upper row of loops, and "up" through the
lower row.
Pull the yarn securely, then go up through the next stitch.
Continue in this manner for at least one inch. To turn and
go back the other direction, simply go up through the closest
loops above or below the current row and begin working in the
opposite direction.
Always make sure to weave the yarn only under the surface of the
loops and NEVER through the entire stitch to the front of the
work, as this would distort the stitches. I always try to
weave a tail around stitches of its own color, but this is not
necessary. As long as you do not go through to the front
of the work, the weaving will be invisible to the front of the
piece.
Trial and error led me to develop this method of assembling panels and pieces. One of my afghan designs was wider than I could accommodate on a regular 14 inch afghan hook, so I decided to make it in three pieces. I tried several means of sewing the panels together, but none of them seemed to work the way I wanted them to. I finally settled on crocheting the second panel and attaching it to the first panel as I went.
Join new yarn to the first piece with a
slip stitch in the lower right corner. Chain the required
number of stitches for the next panel. 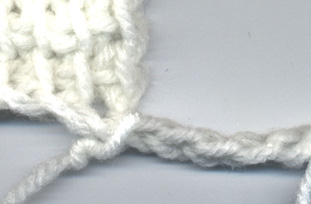
Draw up a loop in each chain across as usual. Insert hook
in to the "V" of the outside stitch and through the
stitch behind it. Here is the view from the front.
And here is the back.
It is very important to go through both of these loops so that
the front side will give the appearance of a normal stitch.
Then simply yarn over and draw through a loop.
Yarn over and draw through two loops.
Continue working the afghan stitch as normal, yarning over and
drawing through two loops to the end of the row.
When finished, the seam between the two pieces is would be virtually invisible to anyone but the most scrutinizing crocheter.
One important point to remember about working with panels is that
the first loop on the right side of the piece is not a full stitch.
While it may appear to be the same width as other stitches, once
the edge is finish or a panel is added, it will only be a vertical
bar. (see Counting Stitches)
There has been much debate about what constitutes a single "afghan stitch". Some say that the LAST loop on the hook is not a stitch because you only draw through one loop to make it. Others say that EVERY loop on the hook counts as a stitch. That was what I thought as well, until I started working in panels. Because of the way panels and color changes work, I have concluded that the vertical bar and the solid space to its RIGHT are what constitute a single stitch.
The last loop on the hook IS a stitch (because there is a solid
space to its immediate right), but the first loop on the hook
(which is left from the previous row) is not. Therefore,
when following or charting graphs, keep in mind that the first
loop on the hook does not count (unless otherwise specified in
the pattern).
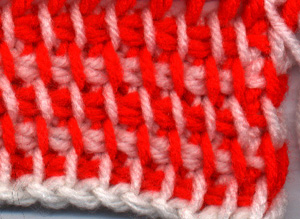
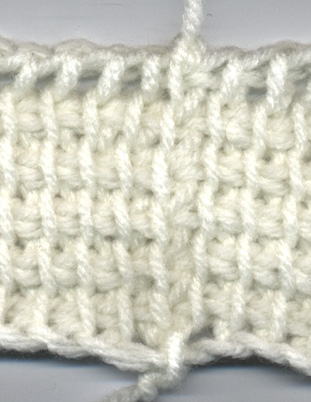
Did you know that you can get a two-tone
effect by using two different colors of yarn?
The result will be something like this: